
Installing SW-MoTech Highway Bars On Your Nine T - Mike Mas
“A real plus for SW-MOTech bars is they are located in front of the jug, so in the event you strike an obstacle, it first hits the bar and not the jug. Most other bar sets do not offer this protection”
I’ll Have to Admit - It was quite a chore making a final decision on what kind of protection to add to my bike in the “Unlikely Event” she decides to go shiny side down. While there is a number of fancy names for these protector bars like; Sliders, Crash Bars or Highway bars, Cylinder Protectors etc. they all have the same function which is to protect our beautiful Boxer jugs sticking out the side of our pride & Joy.
My Requirements Were - The bars had to look like BMW stuck them on there. Secondly, I didn’t want any valve cover sliders or bars covering my beautiful freshly painted Silver Jugs which are the Trademark of this bike.
![Image]()
If you guys are Like Me - I always visualize the worst case scenarios, where I slip on a giant glob of dump truck oil at a traffic light and the bike plops down popping a hole in my valve cover. Ok, maybe this is a little over-board. Anyhow, its better to be safe than sorry so I began another Google Quest to find the best protection at a reasonable price with hopefully some easy installation.
Cylinder Head Sliders - I’m not really sure Sliders are the proper term, but essentially what they do is; allow the jug to slide down the highway wearing off you expensive protector instead of your valve covers. These sliders are the easiest to install since they simply bolt to light hardware on the cylinder head instead of mounting to the frame like crash bars.
These are typical Sliders that easily mount to the cylinder head.
![Image]()
![Image]()
Some Sliders - Are even available in Carbon Fiber to dress the bike up. Of course in a real “Slam Down” these protectors are somewhat structural limited since they only attach to the cover hardware and are mounted very close, if not touching the cover so there is always a possibility you might screw something else up or even crack open your valve cover. The downside of these sliders is even a moderate drop or slide, it will screw up the finish and you’re confronted with buying another pair of covers again which normally sell for around the same price as the bars or around $225-250.
Steel Bar Protectors - These rigid bars are possibly the best and safest choice for you R9T since they offer considerably more protection for both the engine and bike since they protect the engine from any contact to the ground. A major plus with highway bars is the fact after a tip over or slide, you just get some 220 sandpaper out, scrub the bars for a few minutes, touch it up with a $2.95 can of satin black paint and you off on your way. There is no damage or additional expense.
![Image]()
Choosing the Right Bar - Is not an easy task, because if you guys are like me, I don’t want to do anything to obstruct or cover up the exposed Jugs which are a trademark for the R9T. There are many manufactures and most all of them actually have the bars going over the valve covers. I don't care for this because first it distracts from the beauty of the engine and secondly, I am not taking these back off to do a valve adjustment or inspections.
![Image]()
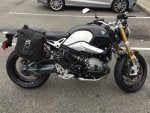
My Right Choice - Was a set of crash bars from the folks at SW Motech. I found them on the Revilla Site for $248. These bars are heavy gauge steel and come with all the replacement hardware to mount them on your bike. The set of bars with hardware will add 12 pounds to your bike but they will be well worth it in the event she tips over. A real plus for SW MOTech bars - Is they are located in front of the jug, so in the event you strike an obstacle it first hits the bar and not the jug. Most other bar sets do not offer this protection.
![Image]()
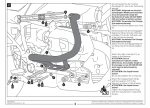
Installing the Bars - Is fairly straight forward, begin with placing your wife’s best bath towels over each jug to prevent the bolt and socket extensions from scratching the paint. You’ll begin by removing one “Gynormas" long Torx 55 forward engine bolt and be replacing it with the longer supplied bolt. You’ll slip a flat washer on the bolt then through the upper bar hole then add the correct spacer and carefully slide the bar and bolt though the bike where afterwards this same bolt will hold the upper portion of the right bar with a spacer.
This is the stock hardware you’ll be removing for the install and the TorK 55 and Blue Locktite you’ll need.
![Image]()
This is the replacement Hardware provided with the bar set from SW Motech
![Image]()
Note: I recommend only removing the lower bolt hardware (55 Torx) on one side at a time to prevent any movement of the frame member. Sitting on the bike you’ll start with the left side or (port side). Two very important things to remember is to use blue Locktite on the hardware and most important remember while you can torque down hard on the top bolt, when tightening the lower bolts use caution not to over-tighten them since they are seated in the aluminum crankcase which could be damaged if you over-tighten the bolt. You’ll be safe just adding Blue Locktite (Not Red) and just tighten firmly, since there is no weight or movement on these bars.
![Image]()
There are two lower attaching points; begin with the one towards the rear, you’ll remove a engine bolt then use the longer bolt with a washer and correct spacer. Next, a second bolt washer and spacer is added to the lower forward side where there is a tapped hole already in place. Finish your installation by adding the right (starboard) side bar with the correct hardware and spacers and your done.
![Image]()
In Conclusion - I love the way the SW Motech bars look absolutely stock and go around the cylinder head instead over them as others do. Aside from offering the best protection, they also offer an opportunity for me to mount some needed fog lights.
Best Regards - Mike Mas
SW-MOTECH Crash Bars BMW R NineT 2014-2017 / $248
https://www.revzilla.com/motorcycle/sw-motech-crash-bars-bmw-r-ninet-2014-2017
![Image]()
“A real plus for SW-MOTech bars is they are located in front of the jug, so in the event you strike an obstacle, it first hits the bar and not the jug. Most other bar sets do not offer this protection”
I’ll Have to Admit - It was quite a chore making a final decision on what kind of protection to add to my bike in the “Unlikely Event” she decides to go shiny side down. While there is a number of fancy names for these protector bars like; Sliders, Crash Bars or Highway bars, Cylinder Protectors etc. they all have the same function which is to protect our beautiful Boxer jugs sticking out the side of our pride & Joy.
My Requirements Were - The bars had to look like BMW stuck them on there. Secondly, I didn’t want any valve cover sliders or bars covering my beautiful freshly painted Silver Jugs which are the Trademark of this bike.

If you guys are Like Me - I always visualize the worst case scenarios, where I slip on a giant glob of dump truck oil at a traffic light and the bike plops down popping a hole in my valve cover. Ok, maybe this is a little over-board. Anyhow, its better to be safe than sorry so I began another Google Quest to find the best protection at a reasonable price with hopefully some easy installation.
Cylinder Head Sliders - I’m not really sure Sliders are the proper term, but essentially what they do is; allow the jug to slide down the highway wearing off you expensive protector instead of your valve covers. These sliders are the easiest to install since they simply bolt to light hardware on the cylinder head instead of mounting to the frame like crash bars.
These are typical Sliders that easily mount to the cylinder head.


Some Sliders - Are even available in Carbon Fiber to dress the bike up. Of course in a real “Slam Down” these protectors are somewhat structural limited since they only attach to the cover hardware and are mounted very close, if not touching the cover so there is always a possibility you might screw something else up or even crack open your valve cover. The downside of these sliders is even a moderate drop or slide, it will screw up the finish and you’re confronted with buying another pair of covers again which normally sell for around the same price as the bars or around $225-250.
Steel Bar Protectors - These rigid bars are possibly the best and safest choice for you R9T since they offer considerably more protection for both the engine and bike since they protect the engine from any contact to the ground. A major plus with highway bars is the fact after a tip over or slide, you just get some 220 sandpaper out, scrub the bars for a few minutes, touch it up with a $2.95 can of satin black paint and you off on your way. There is no damage or additional expense.

Choosing the Right Bar - Is not an easy task, because if you guys are like me, I don’t want to do anything to obstruct or cover up the exposed Jugs which are a trademark for the R9T. There are many manufactures and most all of them actually have the bars going over the valve covers. I don't care for this because first it distracts from the beauty of the engine and secondly, I am not taking these back off to do a valve adjustment or inspections.

My Right Choice - Was a set of crash bars from the folks at SW Motech. I found them on the Revilla Site for $248. These bars are heavy gauge steel and come with all the replacement hardware to mount them on your bike. The set of bars with hardware will add 12 pounds to your bike but they will be well worth it in the event she tips over. A real plus for SW MOTech bars - Is they are located in front of the jug, so in the event you strike an obstacle it first hits the bar and not the jug. Most other bar sets do not offer this protection.

Installing the Bars - Is fairly straight forward, begin with placing your wife’s best bath towels over each jug to prevent the bolt and socket extensions from scratching the paint. You’ll begin by removing one “Gynormas" long Torx 55 forward engine bolt and be replacing it with the longer supplied bolt. You’ll slip a flat washer on the bolt then through the upper bar hole then add the correct spacer and carefully slide the bar and bolt though the bike where afterwards this same bolt will hold the upper portion of the right bar with a spacer.
This is the stock hardware you’ll be removing for the install and the TorK 55 and Blue Locktite you’ll need.

This is the replacement Hardware provided with the bar set from SW Motech

Note: I recommend only removing the lower bolt hardware (55 Torx) on one side at a time to prevent any movement of the frame member. Sitting on the bike you’ll start with the left side or (port side). Two very important things to remember is to use blue Locktite on the hardware and most important remember while you can torque down hard on the top bolt, when tightening the lower bolts use caution not to over-tighten them since they are seated in the aluminum crankcase which could be damaged if you over-tighten the bolt. You’ll be safe just adding Blue Locktite (Not Red) and just tighten firmly, since there is no weight or movement on these bars.

There are two lower attaching points; begin with the one towards the rear, you’ll remove a engine bolt then use the longer bolt with a washer and correct spacer. Next, a second bolt washer and spacer is added to the lower forward side where there is a tapped hole already in place. Finish your installation by adding the right (starboard) side bar with the correct hardware and spacers and your done.

In Conclusion - I love the way the SW Motech bars look absolutely stock and go around the cylinder head instead over them as others do. Aside from offering the best protection, they also offer an opportunity for me to mount some needed fog lights.
Best Regards - Mike Mas
SW-MOTECH Crash Bars BMW R NineT 2014-2017 / $248
https://www.revzilla.com/motorcycle/sw-motech-crash-bars-bmw-r-ninet-2014-2017


")